


Methods may vary widely depending on the profile, experience and equipment, available, but here are some useful tips on joining frames!
The Right Angle
All the best tools and experience will do you no good if you don’t have your pieces cut to the right angle.
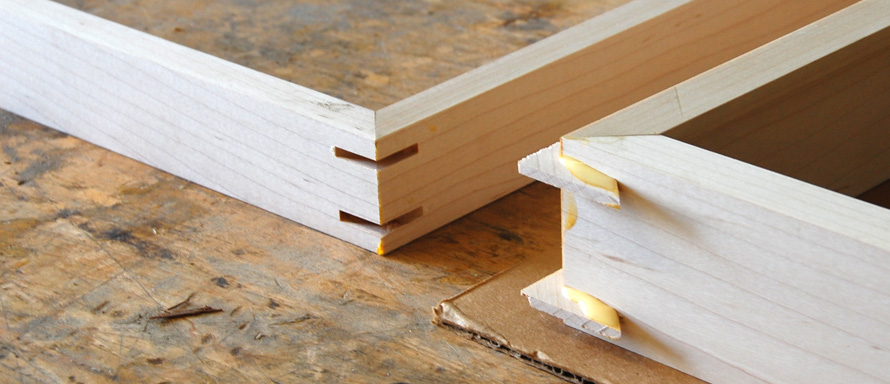
Hoffmann Dovetail System
Although the “underpinner” or “v-nailer” has been the most commonly used joining system for the last few decades they don’t really make the grade when it comes to joining tall profiles such as are the staple in our line. The Hoffmann Dovetail joining system is ideal in this situations. It retains the invisible fastener advantages of a v-nail, but with the ability to insert keys up to 90mm (over 3-1/2”) the joint is held firmly all the way to the top of all but the most extreme profiles.
You can order your mitered chops ready to assemble from Vermont Hardwoods with the slots routed and keys included for a quick, easy and strong frame, which will be shipped at relatively low cost compared to a joined frame. For more info on this system including tips for assembly, check out this article.
Web or Strap Clamps
These handy devices work great for gluing a whole frame together. You let the glue set up and then nail it. They work on the same principle as a ratchet tie-down strap, making it quick and easy to change from one size to another. They are also very inexpensive, and as long as you have a well cut miter the frame will self-square itself. Then all you have to do is nail it.
Nailing
While a v-nail works great in flat/wide profiles, we have yet to find a machine that will stack nails high enough to join one of our typical cap style mouldings. If you don’t have a Hoffmann Dovetail system machine and are chopping your own moulding rather than buying pre-routed chops you may just have to get out the hammer and nails. To hand drive nails into hardwood you will have to pre-drill. If you don’t have a drill bit of the proper size (those little ones seem to have a way of breaking…), you can use one of the nails you’re joining the frame with. Just grind or file the head off (parallel to the nail or it will end up too short), and put it in your drill. It may tend to burn a bit, and the going will be a bit slower but it is very functional and it’s almost impossible to break a nail.
One other handy method of nailing is a power nail gun. You will want to look for either a Brad Nailer or a Headless Pinner. The nice thing about a headless pinner is that the hole it leaves is so small you won’t even need to fill the hole in many cases. However, you will HAVE to cross-nail (put one or more in each side of the corner), as they are not very resistant to pulling through.
A Good-Looking Joint
Unless you are making finished corner frames from raw moulding it is exceedingly difficult to chop and join finished moulding and end up with flawless joints. Here are a couple tips to make them look better.
Pre-color the Ends
This is most important when using a moulding that has a finish significantly different in color than the base wood. Get an assortment of colored markers and color the edge of the miter cut with a color closest to the finish color. Then if there is a slight gap or misalignment it will be much less noticeable.
Fillers
We will readily agree that no one likes to admit they putty their joints, occasionally you may find yourself in a place with no other options. As long as the joint is substantially tight, and you have a mechanical fastener (nails or v-nails) you can safely fill in the odd gap. Colored waxes are one option, but we have been very happy with both CC Paste and CJ Paste, especially on white frames, which are nigh on impossible to join without a noticeable line at the miter.
Good luck joining frames!