


You may have discovered a local company that sharpens your knives well and at a reasonable price. We have no intention of destroying a good relationship, but if you are unsatisfied with your cutting we highly recommend factory authorized and US importers of Morso, Hoffmann Machine Company or Tech Mark. They will hollow grind your knives to original factory specs and could well put your chopper into a whole new class of machine.
Learning how to cut picture frame joints to produce the best results is a matter of maintaining sharp knives in your chopper, and using the following best practices. We’re also including “chopper” tips to make sure your getting the cleanest cut possible.
Chopper 101: Getting it Sharp
You may have discovered a local company that sharpens your knives well and at a reasonable price. We have no intention of destroying a good relationship, but if you are unsatisfied with your cutting we highly recommend the factory authorized and US importers of Morso, Hoffmann Machine Co or Tech Mark. They will hollow grind your knives to original factory specs and could well put your chopper into a whole new class of machine.
Be forewarned that if your knives have been being flat ground there will be an additional charge to get them back into spec the first time, but we believe it’s worth it.
The Right Angle for Your Cut
While technically you can make a tight joint with one 44° corner and one 46°, they will not line up correctly on either the inside or outside, so it’s important to check each side of the cut individually.
Here’s the cutting method we use:
- Get a piece of flat stock (such as strainer). Something 1½” to 3″ wide and ¼” to ½” thick works great. Cut the right end of it (with the left blade)
- Cut a piece 3 to 6″ long (the best length will vary based on the width of material and how big your square is)
- Now take that piece, flip it over and re-cut the second end, but with the left blade. Now you will have a piece where both ends were cut with the same knife and angle. This will double any error, making it easier to see and correct
- Hold the two 45° angles against the inside surfaces of an accurate square. A machinist’s scale is preferable. Observe if there is a gap at the inside or outside:
- If there is a gap at the point the angle is too obtuse. With a chopper, you will need to loosen the fence and push it away from you. For a saw, check your manual for applicable adjustments
- If the gap is on the inside the angle is too acute and you will need to pull the chopper fence towards you
- Re-cut both ends, re-check and repeat until you can’t see light anywhere
- Start over at Step 1. for the other side
Chopper Adjustments
You probably take your chopper for granted. After all, it’s cut great joints for you for many years, maybe even decades! You put on a sharp set of knives and it cuts like new again. However there are two places we’ve noticed neglect or lack of understanding that could save you some aggravation and even money.
The Right Height
After your knives start to get worn down from re-sharpening you may find that there is a little triangle at the bottom of the stroke that doesn’t quite get cut off. Don’t run out and buy another set of blades yet, you may well have years of life left.
The head with the knives mounted on it is connected to the foot pedal yoke by a metal rod with very long threads on the bottom. Depending on where it’s set, you quite likely can adjust it to pull the knives down further. In fact, we recommend that when you have new knives you adjust the height so they only extend past the bottom of the actual cut by about 1/8″ or so, and re-adjust when you notice they aren’t making a full cut after a fresh sharpening. This maximizes the height and width of moulding you can cut, as well as limits the amount of travel (and leg lift height) for your everyday chopping.
Tight But Not Too Tight
Surely you’ve noticed that the tip of the knives actually cuts “into” the fence a bit, in that little slot where they meet? If you’ve been having trouble with chips on the back side of your cut it may well be that your knives are not getting quite close enough to the fence. Think about a pair of scissors − if they aren’t tight enough you get a ragged cut. The same thing happens with moulding if the back side is not well enough supported as the knife goes through. Thankfully there’s an adjustment for that too.
Labeled parts so you can follow along with the instructions:
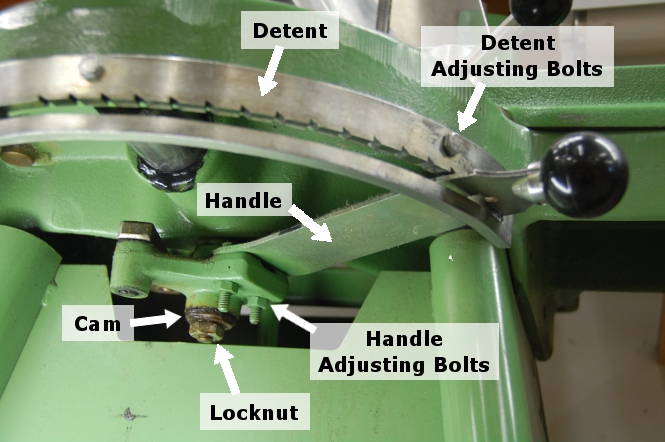
If the adjustment isn’t too much you can probably do it all with the Cam.
- Put the knives all the way in towards the fence, lower them, and lock them down with the factory hold down
- Loosen the locknut
- Carefully move the cam back and forth (180° is the full extent of its adjustment) and watch the knife block move back and forth
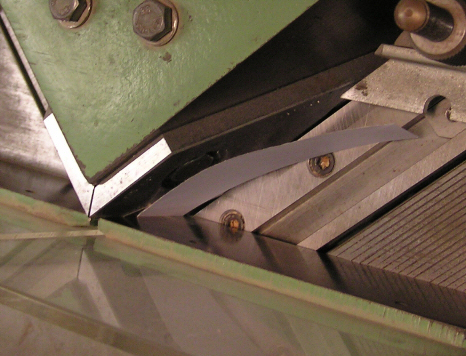
- Take a small piece of regular 20# bond paper and slip it in between the knives and the fence. One side may be closer than the other − use the side with less clearance so you don’t end up running into the fence with the knives:
- Adjust the cam until the piece of paper is just snug
- Maintaining the location of the cam, tighten the locknut. This is a delicate operation and you may need to do it several times to get the setting just right. You want the knives as close to the fence gap as possible without touching
If the cam doesn’t give you enough adjustment, you will need to take one step back and use one of the coarser adjustments.
With the knives still all the way in towards the fence and locked down and a slip of paper between the knives and fence:
- First, adjust the cam to the middle of its adjustment range and lightly snug the locknut
- Loosen the handle adjusting bolts
- Grab the back of the knife block head and pull it towards you until it hits the paper on the fence
- Tighten the handle adjustment bolts and go back to point 1 in the instructions above for adjusting with the Cam
How High?
It’s great that you can cut 4″ tall moulding on your chopper, but do you really need to raise your leg that high to cut those little mouldings? Your chopper should have a hold down mounted in one of the slots that the foot pedal travels in. You can move this to a height that will give you clearance on your typical mouldings and temporarily raise it when necessary
Sometimes you will wish your chopper would cut just a little bit higher or wider. Loosen the hold down and raise the knives all the way up. Reach around to the back side of the hold down, take the bolt all the way out from the front, remove the hold down and voila! another ½” or so.
Chip Removal
Let’s face it, the standard Morso accommodation for chip removal is nothing to brag about (there is none!). Not only that, but if you prefer to locate your chopper with its back against a wall you will have to move the chopper every time you want to empty the chips. Unless you do something like this:
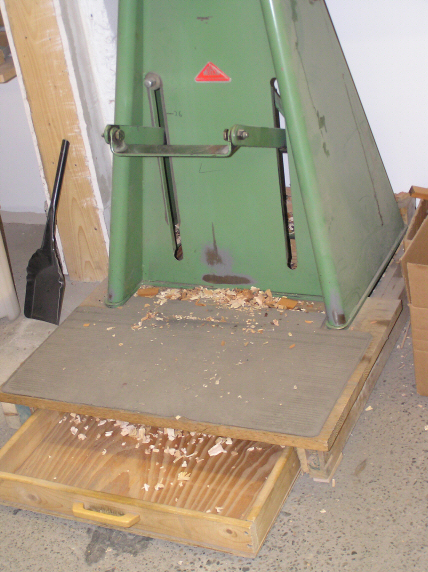
Our simple solution is to raise the chopper a few inches and put a drawer underneath it to catch the chips. A couple of key points:
- Make sure that the inside dimension of the drawer is larger than the opening in the bottom of the chopper
- Unless your framers have really long legs, you probably want to extend a platform big enough to comfortably stand on while chopping
- You may want to close off the back of the chopper as well as you can − those chips fly everywhere and after several years you will have a big pile behind the chopper
Quick Tip: Chopping Picture Frame Joints Upside Down
By putting the moulding in the chopper upside down you eliminate the need for the rabbet supports, which are often troublesome.
Here are some general rules to follow:
- This works only on profiles that have perfectly flat faces (profiles beginning with a 1 or 3)
- It works best on Raw, Sanded, or Oil & Wax finishes – other finishes are more easily marked and can only be cut this way with more care than it’s probably worth
- The backbeveled profiles must be cut upside down if using a chopper to eliminate chipping
- If you use a saw there is probably no advantage to cutting upside down, and there is far greater likelihood of chipping the face − we would recommend against it